迅睿CMS的uniapp开发日记【2】先简单做个列表页
首先说说,我是菜鸟,原来都没接触过这鬼东西,写的不对的,大神多指导,有好的教教我。我只是把我的实现过程分享出来!!!有些也不完善,比我还菜的就等等我学会再改!
1、新建个页面
在pages目录右键点击新建页面,名称list,会自动生成相应的目录及文件,参考如下
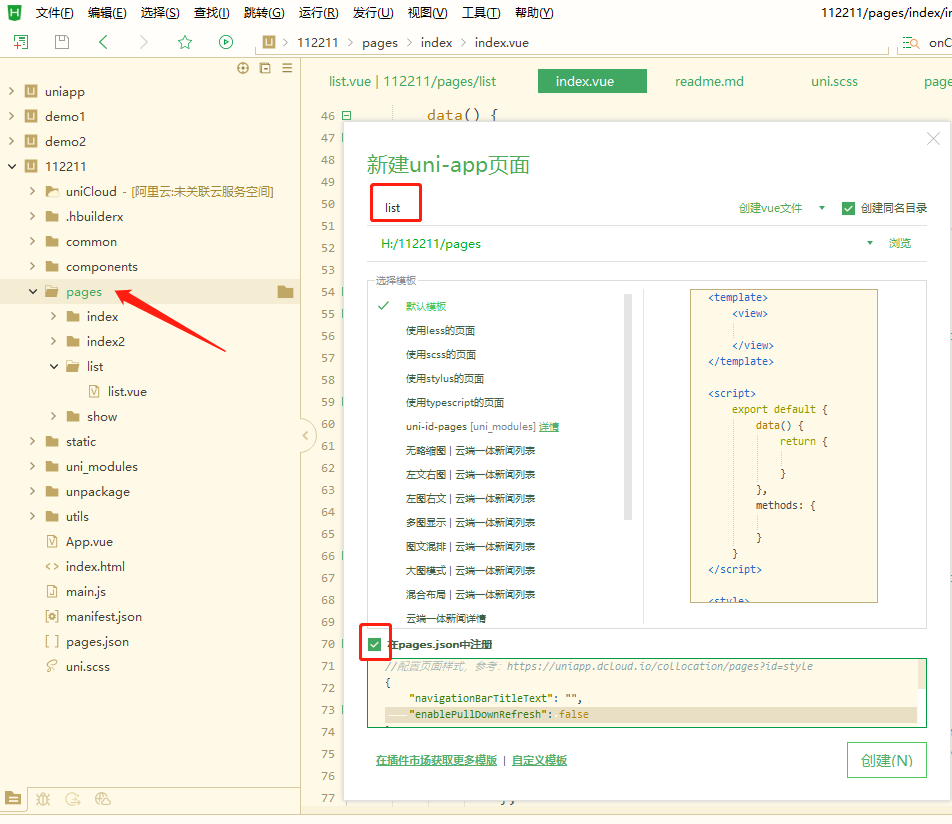
2、新建后页面是长这样的,分块来看就是三个部分
第一个模板代码
第二个js代码
第三个样式
<template>
 <view>

 </view>
</template>

<script>
 export default {
  data() {
   return {

   }
  },
  methods: {

  }
 }
</script>

<style>

</style>
3、页面的设计,我想要在底部有个导航栏,像这样的
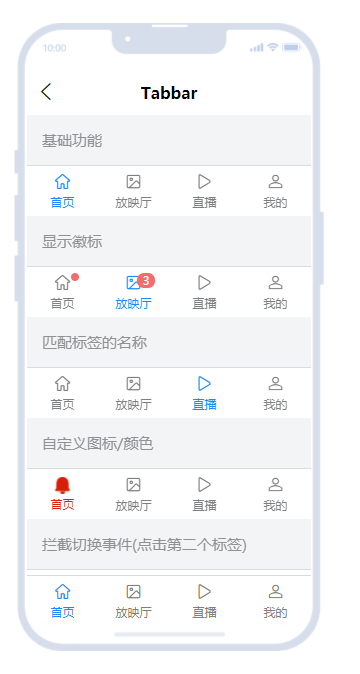
uView里就有,文档地址是:https://www.uviewui.com/components/tabbar.html
参照官方文档,就直接在view代码内写入:
<u-tabbar :value="value6" @change="name => value6 = name" :fixed="true" :placeholder="true"
   :safeAreaInsetBottom="true">
   <u-tabbar-item text="首页" icon="home" @click="onClick_button('/pages/index/index')"></u-tabbar-item>
   <u-tabbar-item text="分类" icon="photo" @click="onClick_button('/pages/list/list')"></u-tabbar-item>
   <u-tabbar-item text="搜索" icon="play-right"></u-tabbar-item>
   <u-tabbar-item text="我的" icon="account"></u-tabbar-item>
  </u-tabbar>
我放了四个,首页的分类的点击事件我加了,其它的后面边学边加,放个首页、分类、搜索、然后有开发会员中心的话,就放个‘我的’
样式什么的要改,参数官方文档
我这里就加了个click事件
@click="onClick_button('/pages/index/index')"这意思是当我点击时,触发js的 onClick_button函数,我把地址参数传过去
所以,要在js的method里写上onClick_button函数,其实就是个跳转的,如下
   onClick_button(tourl) {
    uni.navigateTo({
     url: tourl,
     success: res => {
      console.log(tourl);
     },
     fail: () => {},
     complete: () => {}
    });
   },
到这里,底部的导航栏也就出来了
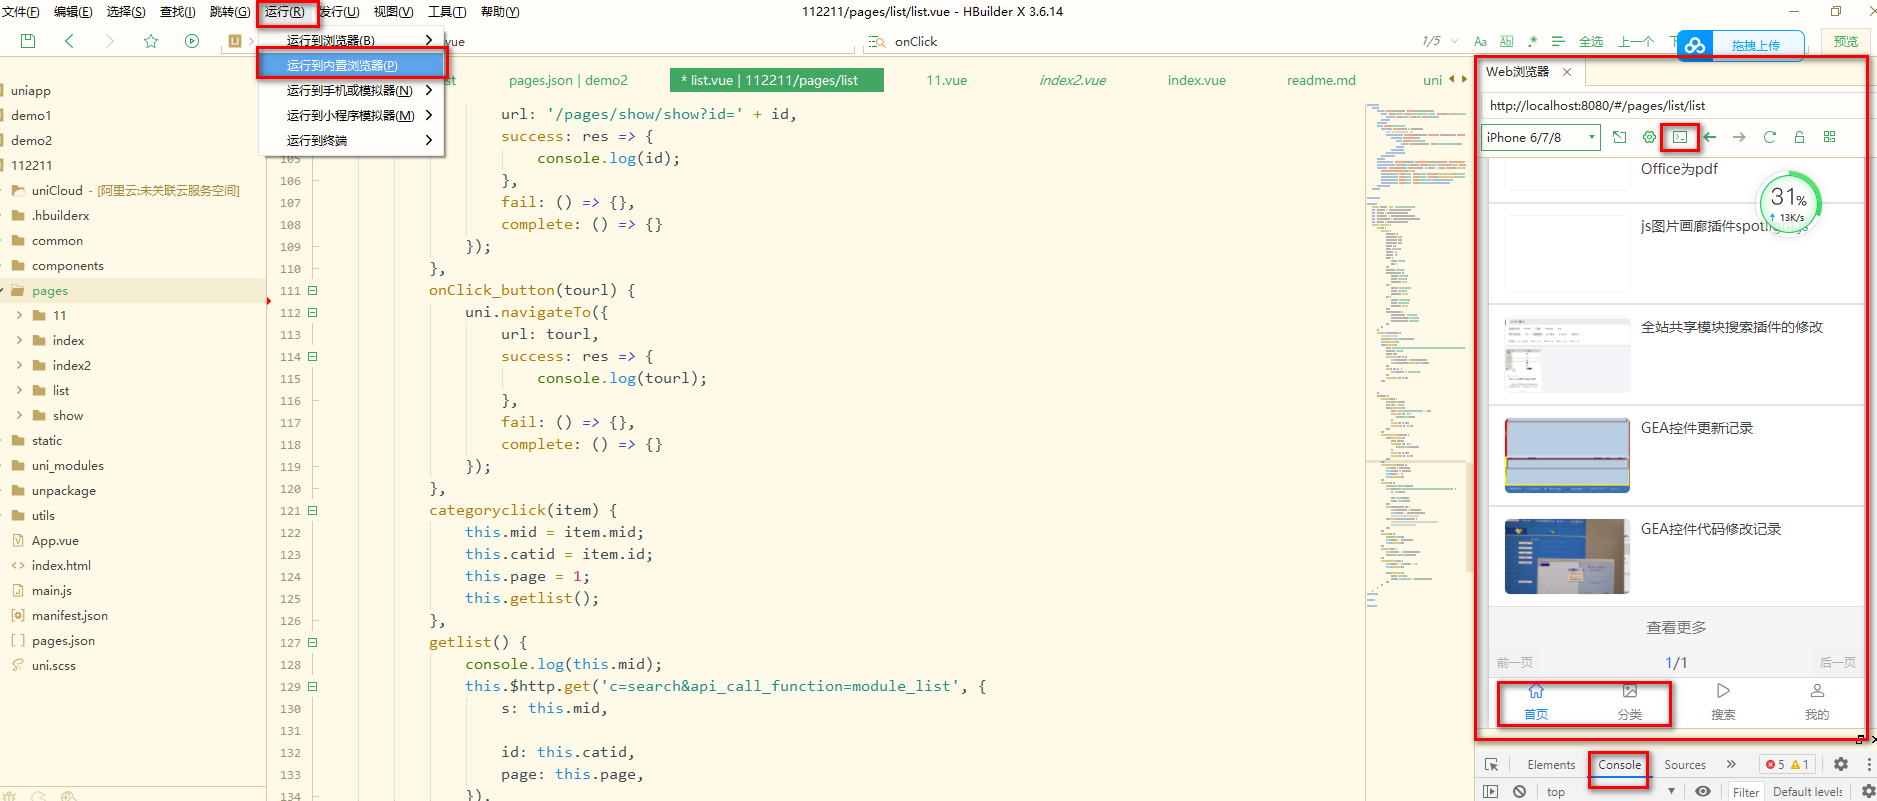
这里候运行到浏览器试试,是不是底部导航栏也就出来了
IDE调试内部浏览器,如果没装,点击了会自己安装,稍等一会
有个调试信息,相当于浏览器F12功能,
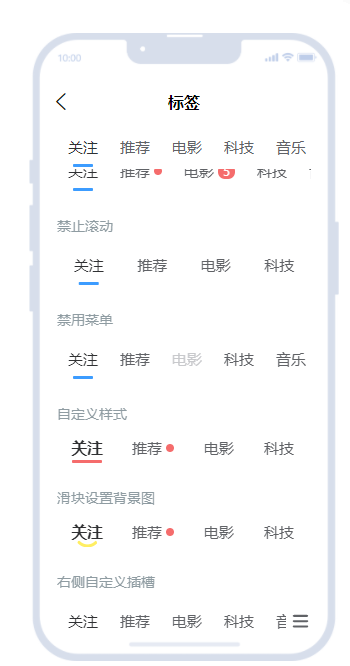
4、同样是页面设计,顶部我想要个列出所有1级栏目,最左边有个全部的,打开默认是所有最新的10条信息
我用的是uview的u-tabs:https://www.uviewui.com/components/tabs.html
像这样
直接按官方的来,在view下面直接加入:
  <u-tabs :list="category" @click="categoryclick">
   <view slot="right" style="padding-left: 4px;" @tap="$u.toast('插槽被点击')">
    <u-icon name="list" size="21" bold></u-icon>
   </view>
  </u-tabs>
来说明代码:
list数据,我定义category,点击事件刚刚有讲到,我定义categoryclick,那个插槽被点击的,我是先留着,看有没有用,后面如果没用删了就好了,这里暂时没用到
先开始说category数据:
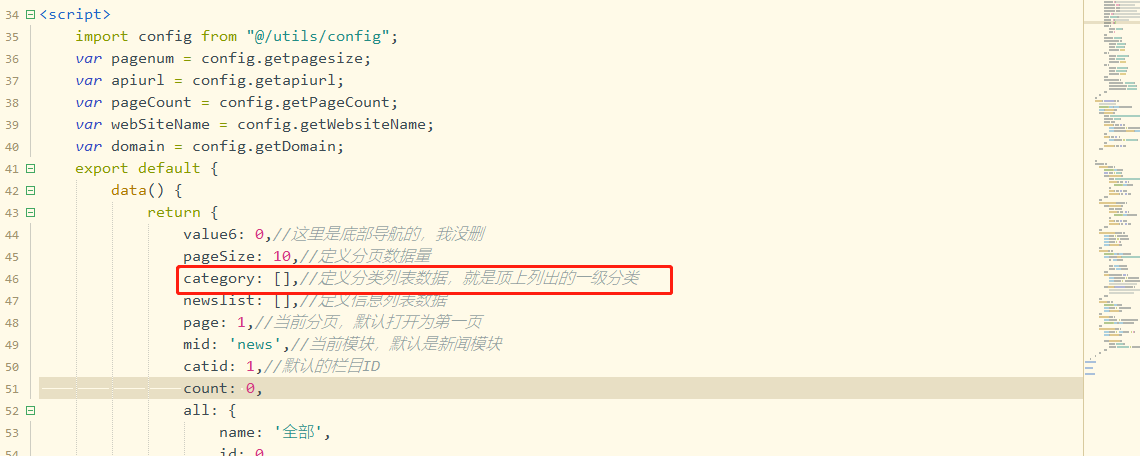
A:在js的data(),return里先定义,其它的后面讲到,圈的就是分类数组。
B:请求数据:在js的onload里,在加载时请求api,获取数值,这里我先不用request的类,直接使用uni-request,比较直观点
   uni.request({
    url: 'http://www.strconvert.com/index.php?s=httpapi&id=3&appid=1&appsecret=PHXXXXXXXX25',
    method: 'GET',
    data: {},
    success: res => {
     this.category = res.data.data;
     this.category.unshift(this.all);
    },
    fail: () => {
     this.status = 'no-more';
    },
    complete: () => {}
   });
这个url,是我新建的api数据的地址,其实直接用栏目的api也是可以
上面代码里 有一个
this.category.unshift(this.all);
这是因为,我取后的分类,并没有“全部”,这个项目,所以我要把“全部”这个添加进数组,定义在data() return里
    //这个all定义就是加入分类数据数组前面
    all: {
     name: '全部',
     id: 0
    },
后台API接口数据是这样的
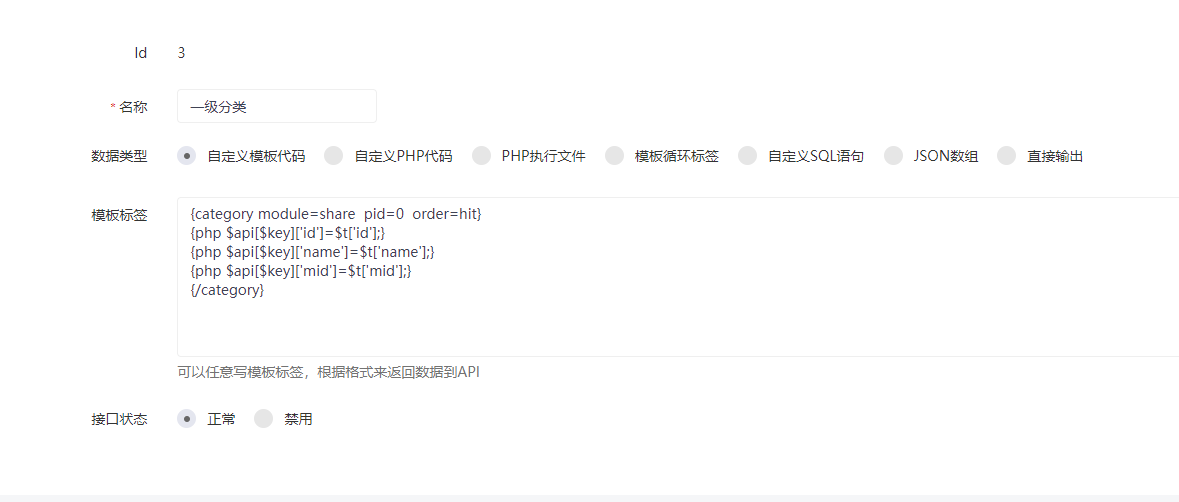
{category module=share  pid=0  order=hit}
{php $api[$key]['id']=$t['id'];}
{php $api[$key]['name']=$t['name'];}
{php $api[$key]['mid']=$t['mid'];}
{/category}
成功的res数据,你们要看不明白,可以使用console.log()来打印调试看看
this.category = res.data.data;
像这样
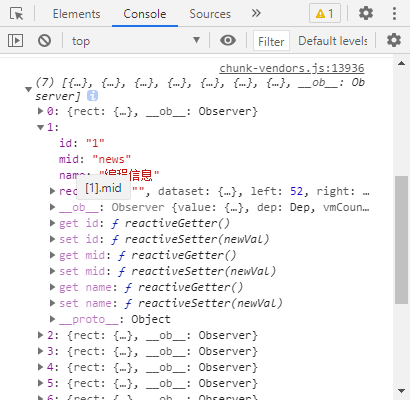
到了这里,测试运行一下,就发现顶部分类导航也出来了

C:点击事件,记得刚才代码里有个点击事件吧,@click那,要在js的method里加个方法categoryclick,代码如下:
   categoryclick(item) {
    this.mid = item.mid;
    this.catid = item.id;
    this.page = 1;
    this.getlist();
   },
这个点击之后,就是把点击对应的分类的模块、分类id、当前页面置1,然后再调用今年数据的getlist方法(这个方法,下一步讲到)
这几个要定义的,同样在data return里我已经有定义过了的
5、页面正文内容,正文内容图文混排
图文混排可以查看uni-ui的图文混排,我这里加个<view>放到顶部导航下面
代码如下:
  <view class="post-list">
   <uni-list v-for="item in newslist">
    <!-- 水平排列,左图右文 -->
    <uni-list-item :title="item.title" clickable :id="item.id" @click="onClick(item.id)">
     <template v-slot:header>
      <view class="uni-thumb">
       <image :src="item.thumb" mode="aspectFill"></image>
      </view>
     </template>
    </uni-list-item>
   </uni-list>
  </view>
这里用到v-for,就是循环,不懂的可以看手册去。
newslist
是我们定义的内容数组,然后后面就循环里就用item.title啊什么的
又看到有个
@click事件,到方法onClick,传参信息id
先说newslist
同样请求api,这回我用request插件来
上面有张图,同样定义了data() return里有 newslist:[]
A:在onload里,调用getlist方法
this.getlist()
B:在method里定义方法getlist,代码如下:
   getlist() {
    console.log(this.mid);
    this.$http.get('c=search&api_call_function=module_list', {
     s: this.mid,

     id: this.catid,
     page: this.page,
    }).
    then((newslist) => {
     this.newslist = newslist;
     //this.count = newslist.total;
     //这里只会在接口是成功状态返回
    }).catch(function(error) {
     //这里只会在接口是失败状态返回,不需要去处理错误提示
     //console.log(error);
    });
   },
this.$http.get
这个参照插件的使用方法,get后面紧跟的是url,因为在插件里已经定义了前面的appid和appcecret和根网址,所以这里只要有后面的参数即可
c=search&api_call_function=module_list
这是官方给出的参数
我们要增加的参数在这里
{
     s: this.mid,

     id: this.catid,
     page: this.page,
    }
记得这个点击栏目里有说到过吧,s是模块,默认就是news,id是分类id,默认是1,page是当前面,在没有点击分页时,默认是1
所以当点击分类时,都按默认来,如果点击了栏目,再重新赋值
返回数组在这里赋值给newslist
then((newslist) => {
     this.newslist = newslist;
     //this.count = newslist.total;
     //这里只会在接口是成功状态返回
    })
(那个count本来是我要取得分类的信息数,但写在获取栏目API那里,但发现,因为数组加了一个,信息空 了一个出来,后面又取消了)
去后台,API模块内容接口那设置一下,模块多的,每个都设置一下调用的数据,把那些要用的和可能要用到的勾上
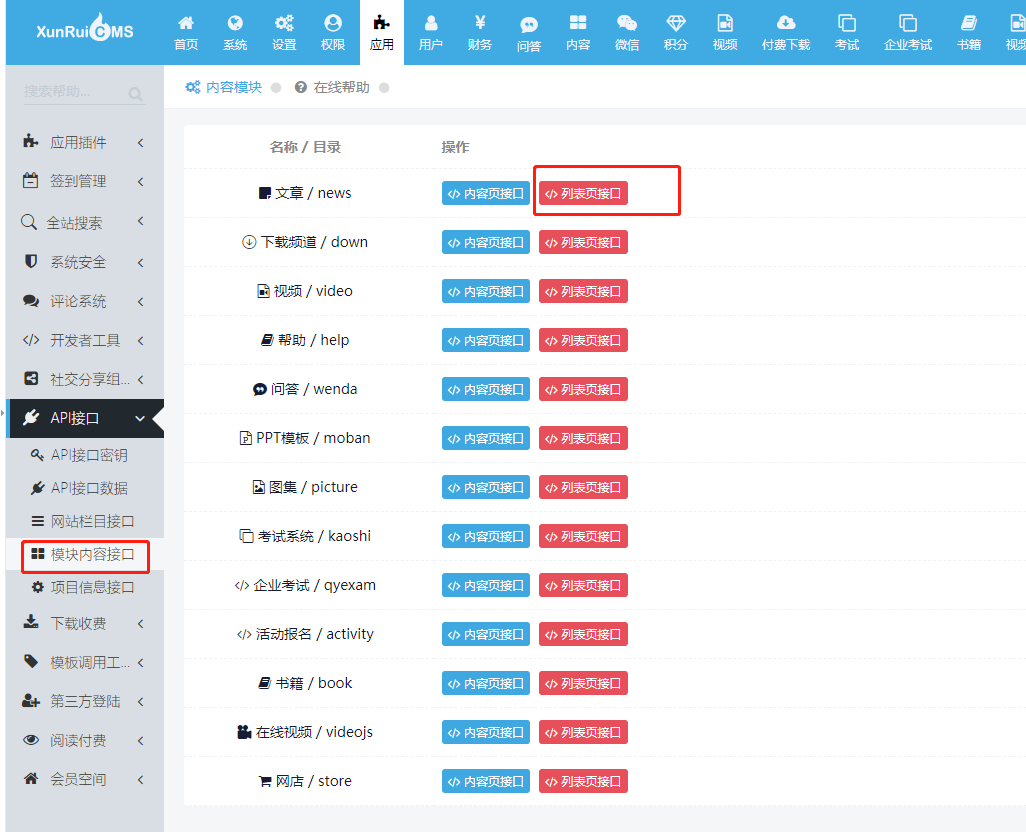
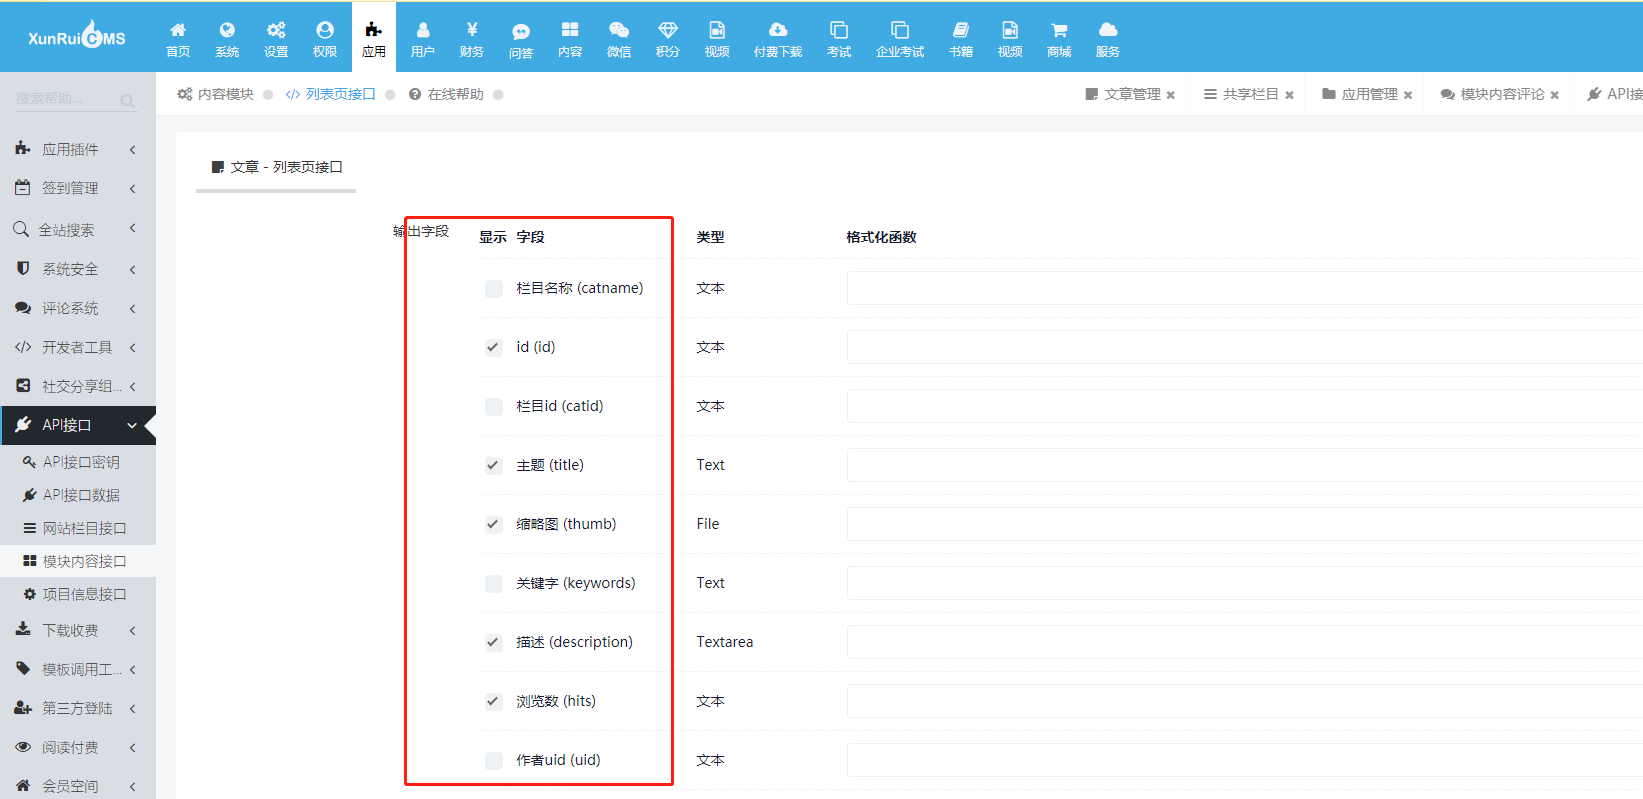
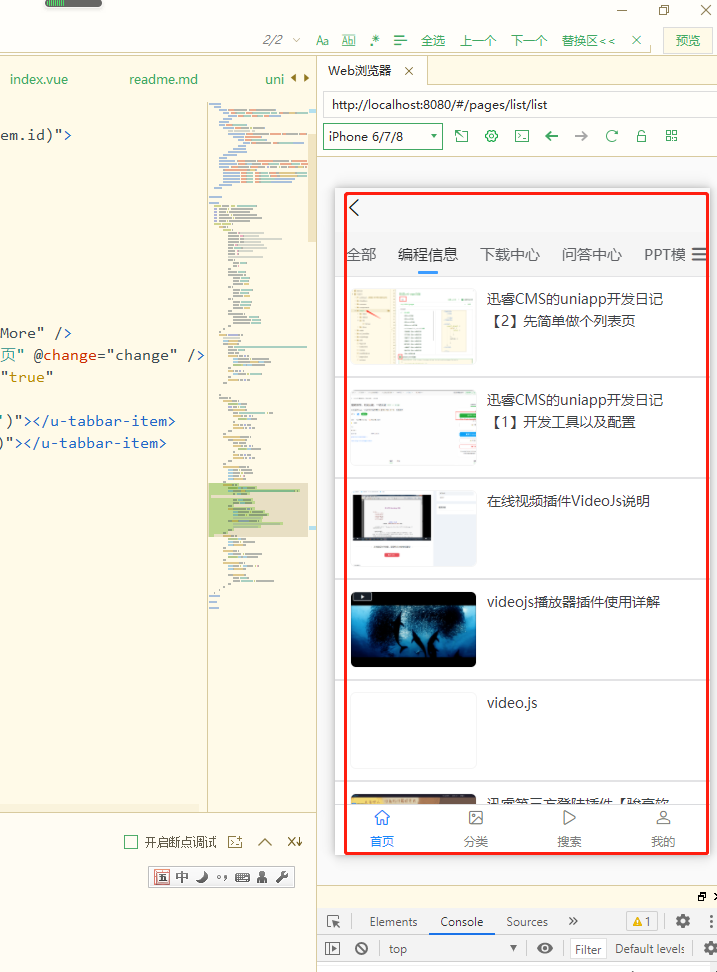
到了这里,运行一下,应该信息都出来了:
6、最后一下,点击后,到跳到信息页去
刚刚列表模板里留了个@click,记得不,方法是onClick,传参是信息ID
在js的method里加这个方法
   onClick(id) {
    var url = './';
    uni.navigateTo({
     url: '/pages/show/show?id=' + id,
     success: res => {
      console.log(id);
     },
     fail: () => {},
     complete: () => {}
    });
   },
这也就是个页面中转的
url提前定义了pages/show/show,加上个id,这个下一节讲到,就是要新建信息页了
7、分页
刚刚说取总数没得到,其实自己建个api接口数据,再得到栏目id也是可以,我这里也不麻烦了,直接用个加载更多的
<uni-load-more :status="status" :content-text="contentText" @clickLoadMore="clickLoadMore" />
这个也没什么好说的了,后面我还是想用分页的,可能更好一些。点击后方法,无非就是把当前面值加1
   clickLoadMore(e) {
    this.page = this.page + 1;
    this.getlist();

    uni.showToast({
     icon: 'none',
     title: "当前状态:" + e.detail.status
    })
   }
8、好了,贴上一整页的代码,分页上下页的,我还没去,先留着后面有空改
<template>
 <view>
  <u-tabs :list="category" @click="categoryclick">
   <view slot="right" style="padding-left: 4px;" @tap="$u.toast('插槽被点击')">
    <u-icon name="list" size="21" bold></u-icon>
   </view>
  </u-tabs>
  <view class="post-list">
   <uni-list v-for="item in newslist">
    <!-- 水平排列,左图右文 -->
    <uni-list-item :title="item.title" clickable :id="item.id" @click="onClick(item.id)">
     <template v-slot:header>
      <view class="uni-thumb">
       <image :src="item.thumb" mode="aspectFill"></image>
      </view>
     </template>
    </uni-list-item>
   </uni-list>
  </view>
  <uni-load-more :status="status" :content-text="contentText" @clickLoadMore="clickLoadMore" />
  <uni-pagination :total="this.count" title="标题文字" prev-text="前一页" next-text="后一页" @change="change" />
  <u-tabbar :value="value6" @change="name => value6 = name" :fixed="true" :placeholder="true"
   :safeAreaInsetBottom="true">
   <u-tabbar-item text="首页" icon="home" @click="onClick_button('/pages/index/index')"></u-tabbar-item>
   <u-tabbar-item text="分类" icon="photo" @click="onClick_button('/pages/list/list')"></u-tabbar-item>
   <u-tabbar-item text="搜索" icon="play-right"></u-tabbar-item>
   <u-tabbar-item text="我的" icon="account"></u-tabbar-item>
  </u-tabbar>
 </view>


</template>

<script>
 import config from "@/utils/config";
 var pagenum = config.getpagesize;
 var apiurl = config.getapiurl;
 var pageCount = config.getPageCount;
 var webSiteName = config.getWebsiteName;
 var domain = config.getDomain;
 export default {
  data() {
   return {
    value6: 0,//这里是底部导航的,我没删
    pageSize: 10,//定义分页数据量
    category: [],//定义分类列表数据,就是顶上列出的一级分类
    newslist: [],//定义信息列表数据
    page: 1,//当前分页,默认打开为第一页
    mid: 'news',//当前模块,默认是新闻模块
    catid: 1,//默认的栏目ID
    count: 0,
    //这个all定义就是加入分类数据数组前面
    all: {
     name: '全部',
     id: 0
    },
    status: 'more',
    statusTypes: [{
     value: 'more',
     text: '加载前',
     checked: true
    }, {
     value: 'loading',
     text: '加载中',
     checked: false
    }, {
     value: 'noMore',
     text: '没有更多',
     checked: false
    }],
    contentText: {
     contentdown: '查看更多',
     contentrefresh: '加载中',
     contentnomore: '没有更多'
    },
   }
  },
  onLoad: function() {
   //取得新闻列表内容
   this.getlist();
   uni.request({
    url: 'http://www.strconvert.com/index.php?s=httpapi&id=3&appid=1&appsecret=PHPCMF890AEE9CBA125',
    method: 'GET',
    data: {},
    success: res => {
     this.category = res.data.data;
     this.category.unshift(this.all);
     console.log(this.category);
    },
    fail: () => {
     this.status = 'no-more';
    },
    complete: () => {}
   });


  },
  methods: {
   onClick(id) {
    console.log(id);
    var url = './';
    uni.navigateTo({
     url: '/pages/show/show?id=' + id,
     success: res => {
      console.log(id);
     },
     fail: () => {},
     complete: () => {}
    });
   },
   onClick_button(tourl) {
    uni.navigateTo({
     url: tourl,
     success: res => {
      console.log(tourl);
     },
     fail: () => {},
     complete: () => {}
    });
   },
   categoryclick(item) {
    this.mid = item.mid;
    this.catid = item.id;
    this.page = 1;
    this.getlist();
   },
   getlist() {
    console.log(this.mid);
    this.$http.get('c=search&api_call_function=module_list', {
     s: this.mid,

     id: this.catid,
     page: this.page,
    }).
    then((newslist) => {
     this.newslist = newslist;
     this.count = newslist.total;
     //这里只会在接口是成功状态返回
    }).catch(function(error) {
     //这里只会在接口是失败状态返回,不需要去处理错误提示
     //console.log(error);
    });
   },
   change(e) {
    console.log(e);
    this.page = e.current;
    this.getlist();
   },
   onChange(e) {
    this.status = e.detail.value
    console.log(this.status);
   },
   clickLoadMore(e) {
    this.page = this.page + 1;
    this.getlist();

    uni.showToast({
     icon: 'none',
     title: "当前状态:" + e.detail.status
    })
   }
  }
 }
</script>

<style>

</style>
上一篇:迅睿CMS的uniapp开发日记【1】开发工具以及配置
下一篇:没有了
